
What's the best alternative to salon eyelash extensions?
I discovered salon eyelash extensions when I was 21 years old, living la vida in London and working a job with a very comfy salary. I instantly fell in love...

Want wispy, glamorous lashes at a fraction of the cost of salon lash extensions? We've got the perfect solution for you - DIY Eyelash Extensions. Get swoon-worthy lashes that last a whole week easily, safely and quickly at home.
Are you a newbie? Keep reading for Imogen's guide to how to apply your lashes.

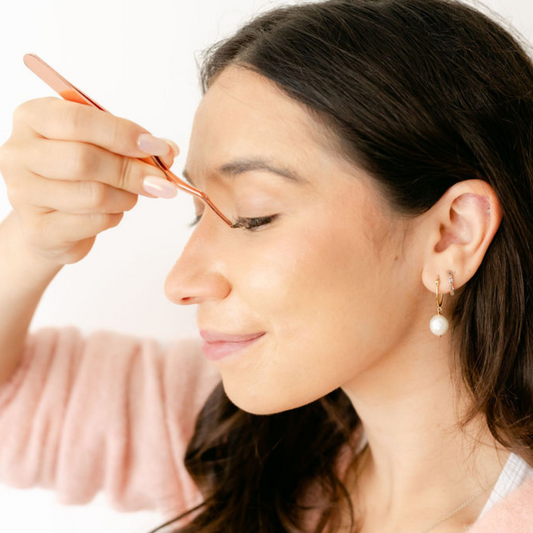
Use the micro-mascara wand on the DIY Eyelash Extensions Glue to apply a small amount of glue to the base of your natural lashes. Be careful only to apply it to the base of your lashes. Top tip: you can also apply the lash glue to the spine of the lash cluster for longer-wear. The specially-formulated, strong-hold glue is available to buy separately or comes as part of the DIY Lash Extensions Kit.

Using our DIY Eyelash Extensions Applicator Tool, apply lash clusters to the underside of your natural lashes, around 1mm from your waterline. Top tip: start with your outer corner and work your way in. Every DIY Eyelash Extensions Kit comes with 3-4 sets of lashes (dependent on how many clusters you use). Purchase lash refills here.

Using our DIY Eyelash Extensions Applicator Tool, clamp the lash clusters together with your natural lashes to ensure a strong hold. The applicator tool comes with the DIY Eyelash Extensions Kit, or can be purchased separately.

Seal the lash clusters onto your natural lashes using our Clear Finishing Coat for an extra strong hold, and remove any residual stickiness from the lash glue. The finishing coat comes with the DIY Eyelash Extensions Kit, or can be purchased separately.
You can remove your lash clusters safely, quickly and easily with our DIY Eyelash Extensions Remover. Simply brush plenty of the remover all over your lashes and wait a moment before taking a cotton pad and wiping the lash clusters and remover off. It may take a couple of applications of the remover to get your natural lashes clean and free from lash glue.
No, not at all! Our DIY Eyelash Extension Kit contains everything a newbie needs to get started with at-home lash extensions. However, like any makeup application, it may take a couple of gos before you get the feel for applying them, and getting lash placement perfect.
Absolutely not! The fibres of the lashes are very light, and we'd recommend applying the DIY Eyelash Extensions Glue sparingly at the base of your natural lashes and along the spine of the lash clusters. The DIY Eyelash Extensions Remover is very nourishing, and will melt away any residual lash glue. Please don't worry if a couple of your natural lashes come out when you remove your lash clusters, your eyelashes fall out and replace themselves in a natural cycle every six to ten weeks, so it's normal to lose between one and five lashes each day.

Transform your lashes in minutes for an instant glow-up and confidence boost.
Our lashes are available in both a natural, shorter length (12mm) or a longer, fluttery length (14mm).
Our DIY Eyelash Extensions Kits include both 12mm and 14mm lashes, and Lash Refills are available in both lengths.
The length and style shown on the left is Emma in 12mm.
I discovered salon eyelash extensions when I was 21 years old, living la vida in London and working a job with a very comfy salary. I instantly fell in love...
Put simply, DIY Eyelash Extensions are like a lovechild of salon lash extensions and false eyelashes. They mimic the eyelash extension "look" that you get from the salon, but you...
Perfect lashes without the hefty price tag and time in the salon? Yes, please! Here's the skinny on DIY Eyelash Extensions and why they're going to be your next favourite...